How To Set A Static IP Address On Raspberry Pi
Some Raspberry Pi projects aren’t paired with a display and input accessories (a.ka. operating headless), and for good reason. First, the more peripherals you connect to the Pi, the more current it draws, which isn’t ideal if you’re running only on battery. Then, there’s the issue of size and portability. A display, keyboard, and mouse can make the project bulky. So if the developers don’t need a user interface to make the project work, they just do away with those components completely.
However, even without these peripherals, you can stillcontrol the Raspberry Pi remotelyusing your Linux terminal or apps like AnyDesk or TeamViewer. Doing so, though, often requires that you know your board’s IP address. The problem is, your router might assign a new IP address to your Pi from time to time.

That means whenever you want to access the board, you’ll have to go through the hassle of opening a network scanning tool like Fing or Angry IP scanner to figure out what this new IP address is. To avoid extra steps, you’re able to simply assign a static IP address to your board. We’ll walk you through some of the ways to set a static IP address on Raspberry Pi before deploying your project.
Preliminary steps
Before you configure a static IP address for your Raspberry Pi, you’ll need to retrieve four key details first: the Pi’s current IP address, the gateway (your router’s IP address), the subnet mask (both in the CIDR notation and dot-decimal notation), and (optionally) the DNS server if you’re using a custom one, like a differentRaspberry Pi set up as Pi-Hole, for instance. This information is required when setting a static IP address as inputting the wrong or invalid values could prevent your board from connecting to the network. Here’s how to get these details:
Now that you have your network details, you may proceed with setting your static IP address.
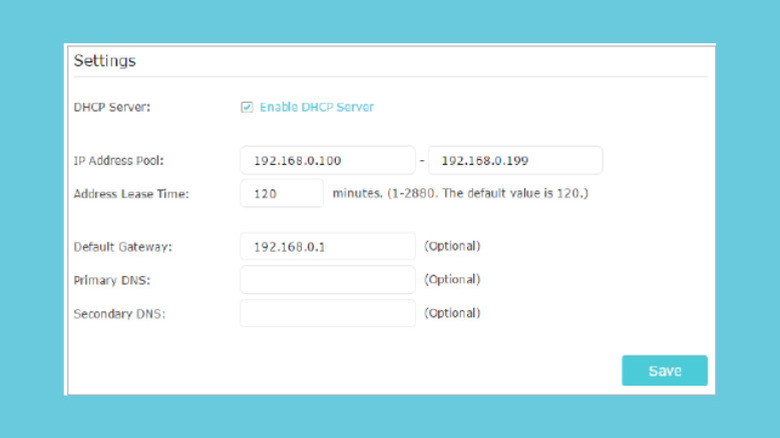
Method 1: Reserve a static IP address for your Pi on your router
The recommended way of setting a static IP address on your Raspberry Pi is directly from the router itself. Here’s a guide for three popular brands:
It’s important to note the process will vary depending on your router manufacturer. So make sure to check your manufacturer’s manual.
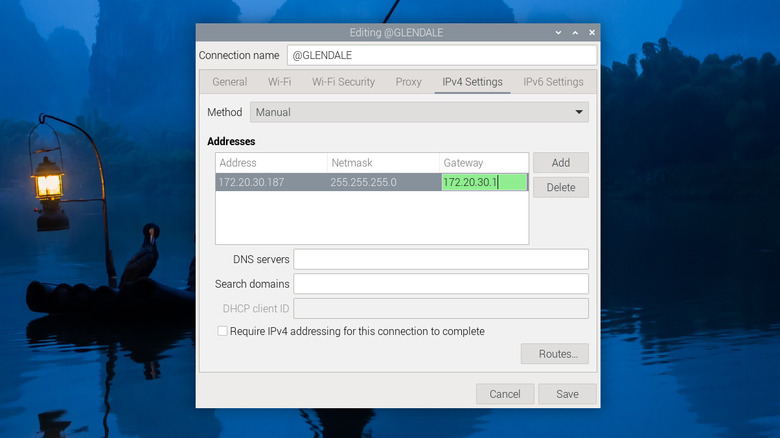
Method 2: Work from the graphical user interface (GUI)
If your router doesn’t support static IP assignments, and your Raspberry Pi is running the desktop version of the Raspberry Pi OS, it’s easy to assign a static IP address from the Network Manager interface. Here’s how:
After the system restarts, check whether your IP address is now set to your preferred address by hovering over the network icon and checking the network details that show up.
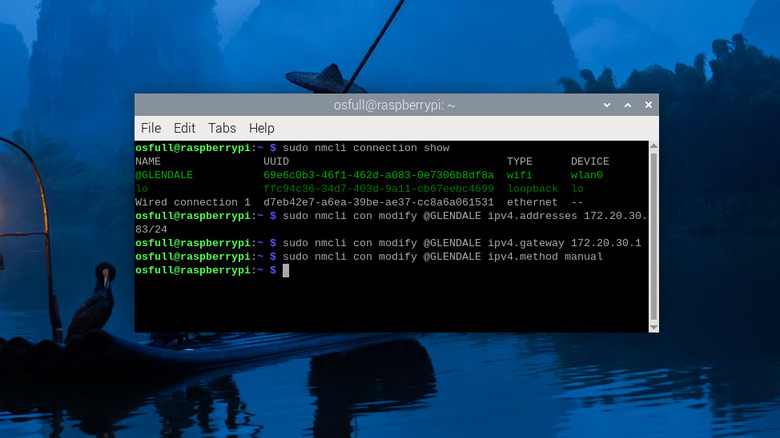
Method 3: Use the NetworkManager Command Line Interface (nmcli)
So you’re running on the Lite version of the Raspberry Pi OS and don’t have a GUI to use. In that case, you’re able to turn to the NetworkManager Command Line Interface (nmcli) instead. The nmcli is similar to the NetworkManager interface on the GUI, but, as its name suggests, it’s accessible on the command line interface and operates entirely on text commands. Here’s a step-by-step guide to use the nmcli to set a static IP address on your Raspberry Pi:
Once the Pi powers up, you can now test whether the assigned IP address was retained. In the CLI, type: hostname -I. It should then output your new IP address.
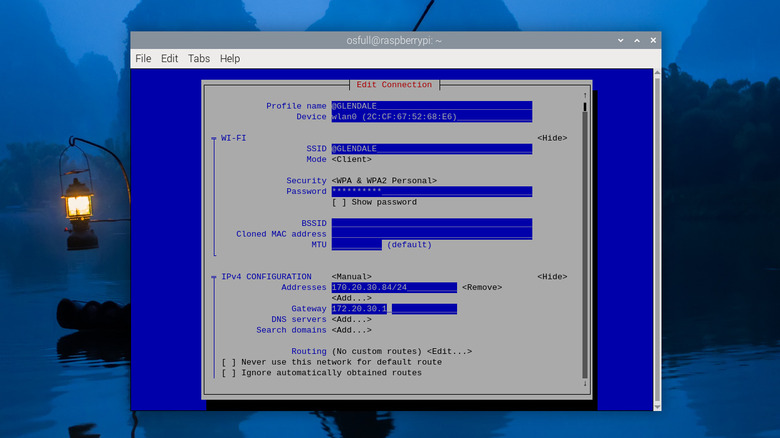
Method 4: Assign the IP address from the NetworkManager Text User Interface (nmtui)
If you’re not comfortable working with text-only commands in the nmcli, a more user-friendly alternative is the NetworkManager Text User Interface (nmtui). It’s also accessible from the command line like the nmcli, but instead of text commands, it displays an interface you may navigate more easily. Follow these steps to use the nmtui to set a static IP address for your Pi:
You can also opt to restart the Pi once and then check the IP address again to make sure the newly set address will survive reboots. With your static IP address set, start tinkering and building yourRaspberry Pi projects.
