What Exactly Does Pi-Hole For Raspberry Pi Do And Will It Block YouTube Ads?
There’s nothing more annoying than seeing ads all over the web page you’re reading. Not only are they irrelevant to the content of the page, but they’re also intrusive and sometimes get in the way of what you really want to see. Sure, you can stop ads on your Android, iPhone, Mac, Windows, and Linux with the help of browser settings, third-party browser extensions, and ad blocker apps. But what about the TV, fridge, and other smart home devices on your home network? And then, there’s the hassle of having to install an ad blocker app or browser extension on every device you own, which can mean spending at least a couple of minutes on each machine. And if you rely solely on browser settings and browser extensions, all they really do is block ads on your browser, not in your other apps.
This is where Pi-hole comes to the rescue. Instead of individually configuring all your phones and computers to block ads, you can allow Pi-hole to automatically block ads for all the devices connected to your home network, from your mobile to your smart toaster. We’ll walk you through how it does so and what you need to do to install it on a Raspberry Pi.

How do ads get embedded on a website?
Before we get into what Pi-hole is and how it works, you need to understand how ads get delivered to a website in the first place. At first glance, it may seem like they’re natively part of the site you’re visiting. However, the reality is that they are actually just embedded. Their data doesn’t usually come from the same domain (website address) as the content, images, and other media appearing on the page, meaning the ads don’t belong to the original website. Instead, they’re typically hosted on a different domain (or subdomain).
So how do they become embedded onto the website? Whenever the browser on your phone, computer, or what-have-you makes a request to access a website address, a process called DNS lookup happens behind the scenes. In this process, your browser essentially reaches out to a so-called Domain Name System (DNS) server to ask for the website’s IP address. This DNS server acts like a phonebook — translating URLs into IP addresses that your browser can better understand and process. Once you receive the IP address of the URL you’re after, your browser proceeds to use this to connect to the website and load its contents. Among the content that gets loaded are the ads that the website pulls from the ad company’s different domain.

Try going to your favorite blog (one you know has ads) and hover your mouse over any ad on the page. You’ll see the ad’s website address momentarily appear on the bottom left corner of the screen. Notice how it’s different from the URL address of the page you’re currently on. Now, with this knowledge in mind, let’s move on to how Pi-hole works to remove such ads.
What is Pi-hole and what can it do?
At its core, Pi-hole is an ad blocker that works by coming in between your device and the DNS server. Instead of having your browser directly ask the DNS server for the IP address of the website you want, the request first goes through the Pi-hole. It checks whether your website is on its blocklist of ad domains and known malicious and malware websites. If it is, then the request is dropped and doesn’t proceed to the DNS server. You’re instead provided with an essentially dead IP address that makes your device think the website is nonexistent.
If, on the other hand, the website you want isn’t included in the blocklist, Pi-hole connects you to the DNS server, which, in turn, sends you the website’s IP address. Using this IP address, your browser is now able to pull the data you need to display the site. However, this data passes through the Pi-hole and gets analyzed again. If it contains ad domains, they’re immediately filtered to leave you with only ad-free content.
How to install Pi-hole on Raspberry Pi
Assuming you’ve alreadyinstalled Raspberry Pi OS on your microSD card, here’s how to get Pi-hole installed on your Raspberry Pi (or any machine with Linux or WSL):
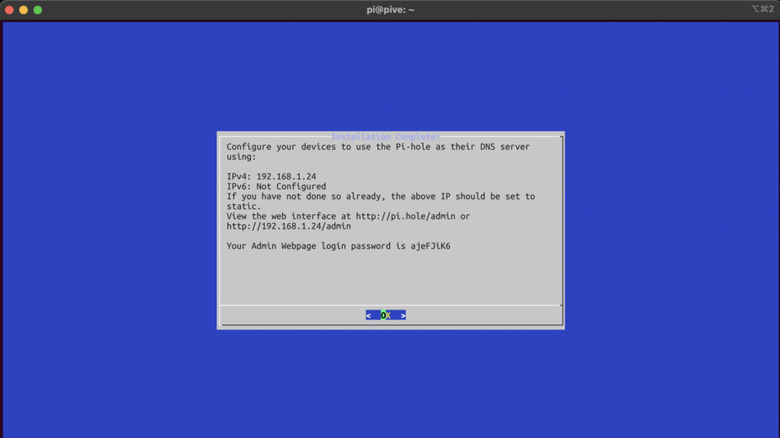
Once you see the Installation complete page, take note of your web interface URL and password that appears. The web interface is accessible at http://pi.hole/admin. You’ll be using this interface later. Then, hit OK to finish.

How to integrate Pi-hole into your network
With Pi-hole installed on your Raspberry Pi, you can proceed with setting up your network to use Pi-hole as your new DNS server instead of the default DNS server in your router. This means any device connected to your network would go through Pi-hole first, effectively eliminating the ads on the content you visit online.
To set up Pi-hole as your new DNS server, log in to your router’s admin interface and look for the DHCP or DNS settings for LAN. Then, under DNS Server, enter the Pi-hole’s static IP address. This is the static IP address you assigned in Step 1. If you forgot what it is, look at the connected devices in your router’s admin interface and find your Raspberry Pi from the list. It should say its IP address. Once you’ve entered this address as your DNS server, verify this is the only DNS server used, or else your devices' connection may be diverted to the other servers and bypass the Pi-hole completely.
Most routers let you add a custom DNS server, so you’ll have no problem setting this up. However, some don’t come with the option to do so. If this is the case for you, another way you can integrate Pi-hole into your network is by configuring each and every one of your devices to use it as their DNS server.Changing the DNS server settings on your Windows, Mac, Linux, iPhone, Android, TV, and other electronics can be time-consuming though, and the process varies per device. The general idea, though, is to go into your home network’s settings/properties on your phone/computer/TV and add the Pi-hole’s address as a new DNS server. Once that’s done, you should be able to browse your favorite websites without getting bothered by ads.
Use the admin interface to manually block websites and add other blocklists
Although Pi-hole’s default blocklist is already quite extensive, blocking over 100,000 domains, there may still be certain ads that sneak past Pi-hole. If you want to up the ad-blocking capability of your Pi-hole, you can manually include new blocklists and even block certain domains via the Pi-hole admin interface. Follow these steps to do so:
The downsides of Pi-hole
While getting rid of ads on all your devices is a dream, there is a price to pay for such convenience. Two of the known downsides of Pi-hole are connectivity and privacy issues. You may experience connectivity issues with Pi-hole when the Raspberry Pi or Linux machine it’s installed on is powered off. Because you’re using the Pi-hole as your DNS server, any DNS requests made by the devices on your network now have nowhere to go. Sure, you might still be able to load websites you’ve previously visited as they have already been cached to your browser/device. However, for brand new websites that still need their IP addresses resolved, they would need the Pi-hole to load on your end. As a workaround, you can go into your router settings and add a different DNS server for your devices to use. But note that this will mean ads, ads, and more ads appearing on your websites.
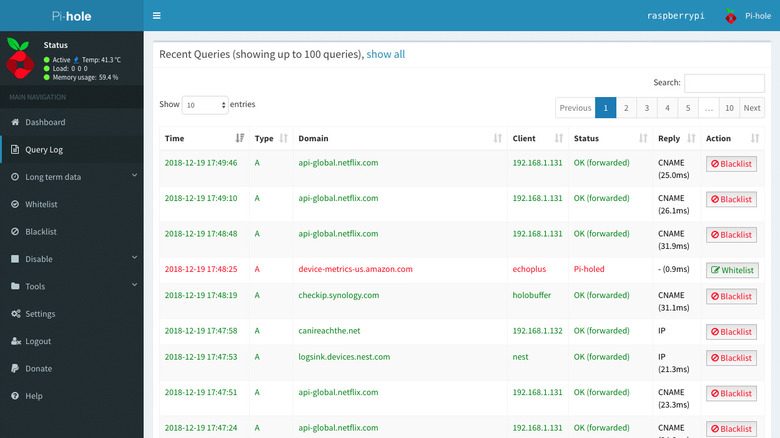
The second downside of Pi-hole is the lack of privacy for the other network users. There’s a Network section in the Pi-hole admin interface where you’re able to see the IP addresses of all the devices using Pi-hole. When you click on one, you will see its query log that lists the domains the device requests. It’s best to let your household members know about this privacy issue, so they can opt out of using Pi-hole if they’re concerned about you snooping on their online activities.
